
Remit Manager allows users to search and view their remits in ANSI and Human Readable formats. It also allows users to import and export their remits. For eMEDIX RCM customers, it provides a way to automatically and manually match remits back to claims. The following options are available for Remit Manager:
To view Remit Manager, click Remit Manager from the Remits drop-down menu. The search criteria default date setting is the Last 14 Days of Open checks. The default view is View Checks By Check Date. Use the View Checks By drop-down menu to change the view. Options are Check Date, Payer, and Received Date. Select View Checks By Payer or View Checks by Received Date change the view. The Simple Search box is located at the top of the screen. Use this feature to quickly search for the most common search options. Mark the check boxes for the desired Date or Payer and click Select to view the remits. Options on the screen are available based on user roles and permissions and therefore may not display for all users.
Note:
There is a 500 record limit on remit queries. If selected search criteria brings back more than that number of payers, the home screen display the first 500 with a warning message to the user to narrow the search criteria to see additional results.
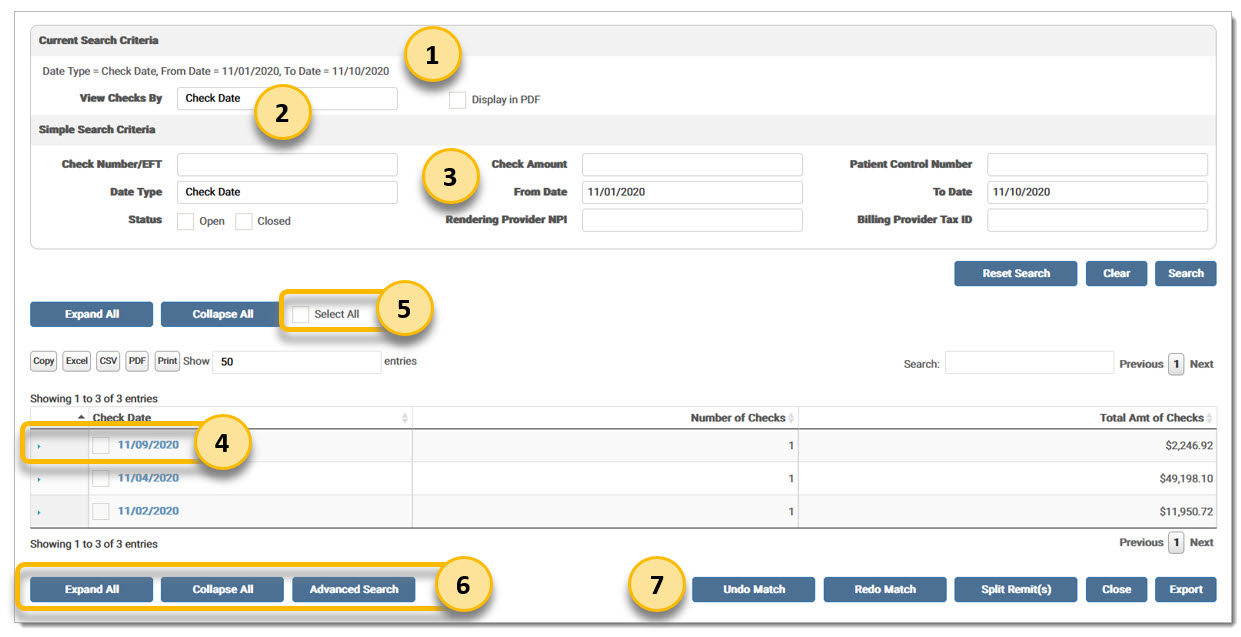
The current search criteria displays here. The default is last 14 days of open checks.
Select a View Checks By option from the drop-down menu to change the view. Options are Check Date, Payer, and Received Date. Select Check Date.
Enter simple search criteria, including Check Number, Check Amount, Patient Control Number, Date, and Status. Select a Date Type from the drop-down menu and enter a date range. Options are Check Date and Received Date. Enter the desired search criteria and click Search to display the results in the grid. Reset Search returns the user to the default search criteria and data after performing a search.
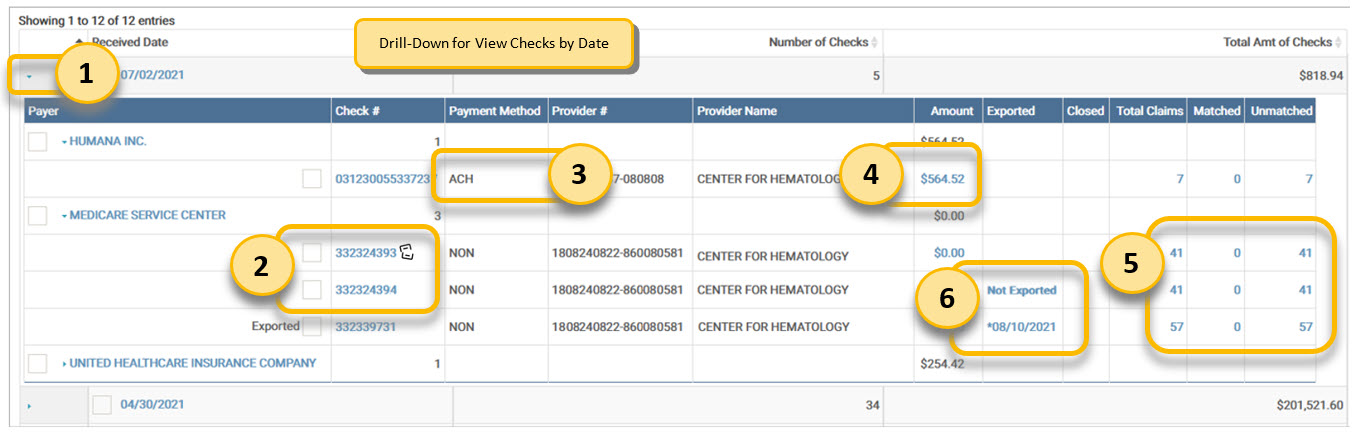
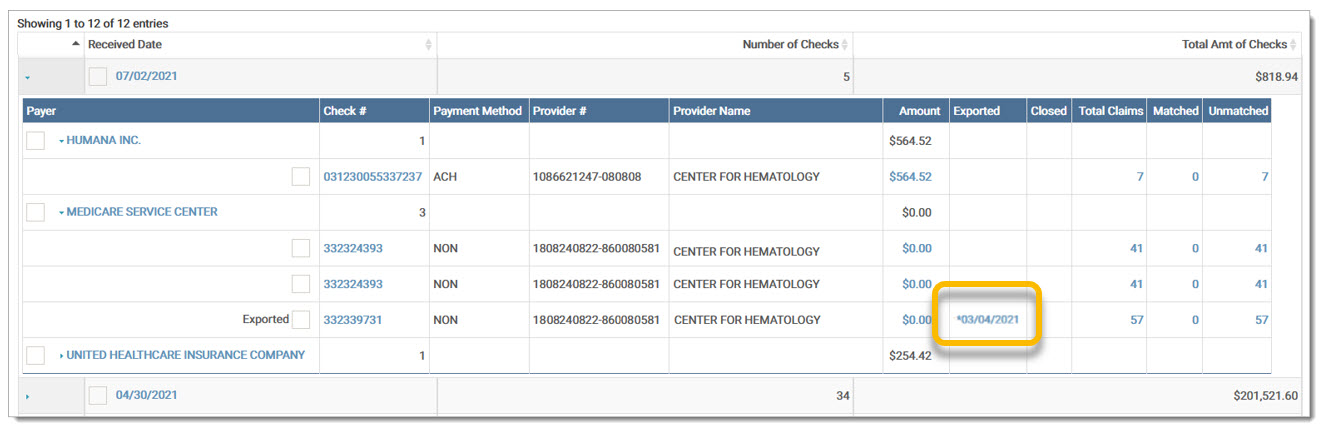
Click the arrow or the date to expand the group of checks.
Check boxes allow the user to select the checks for closing or exporting. Mark the Select All check box to select all options at one time.
Click Expand All or Collapse All to open and close all the date groups. Click Advanced Search to further refine the search options.
Button options are available based on user roles and permissions and therefore may not display for all users. Click Export to download the file. At least one check must be selected to perform the Export function.
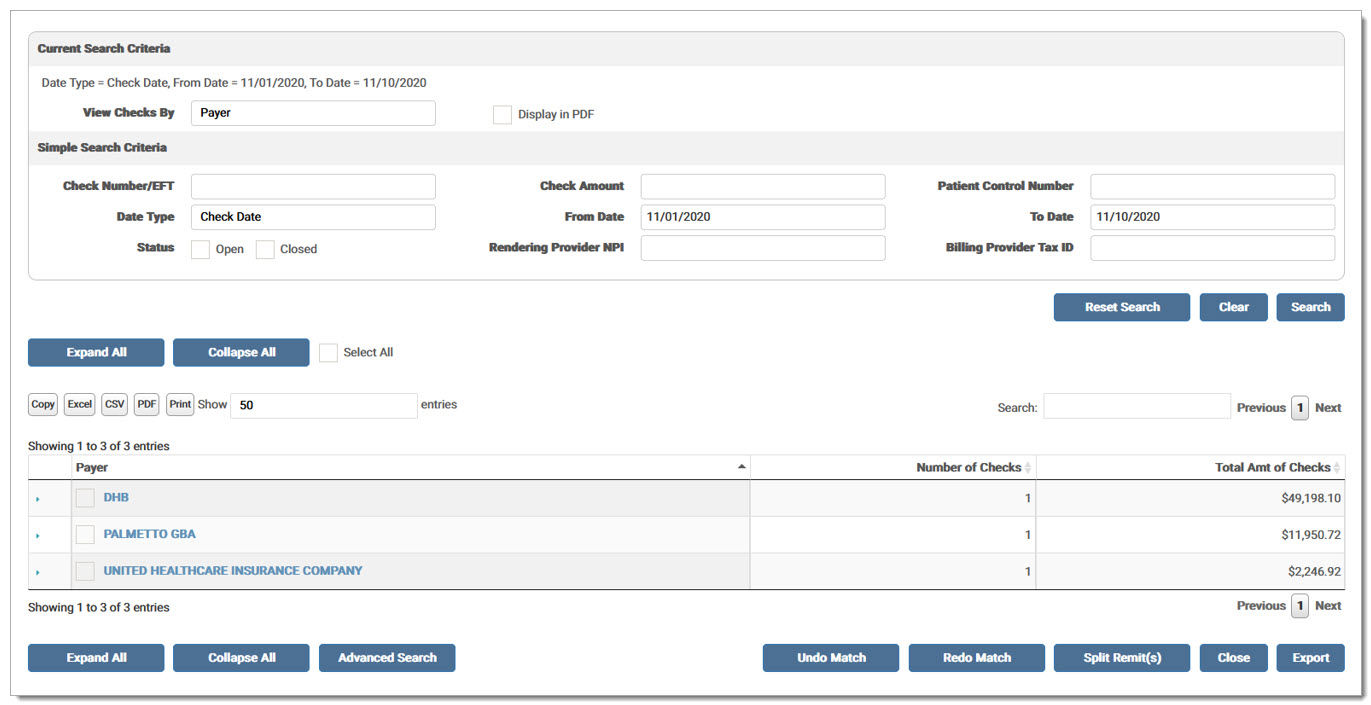
Select an option from the View Checks By drop-down menu to change the view. Options include Check Date, Payer, and Received Date. Select Payer.
Select an option from the View Checks By drop-down menu to change the view. Options include Check Date, Payer, and Received Date. Select Received Date.

The Simple Search feature allows the user to quickly search for the most common search options. Users can search by Check Number/EFT, Check Amount, Patient Control Number, From/To Date, and Open/Closed Status. Please note, when performing a search using Check Number and/or Patient Control Number, the search looks for an exact match. Users must enter % in the field to perform a wild card search. Enter the desired search criteria and click Search to display the results in the grid.
Click the arrow to drill-down for more information and click the down arrow to hide it.
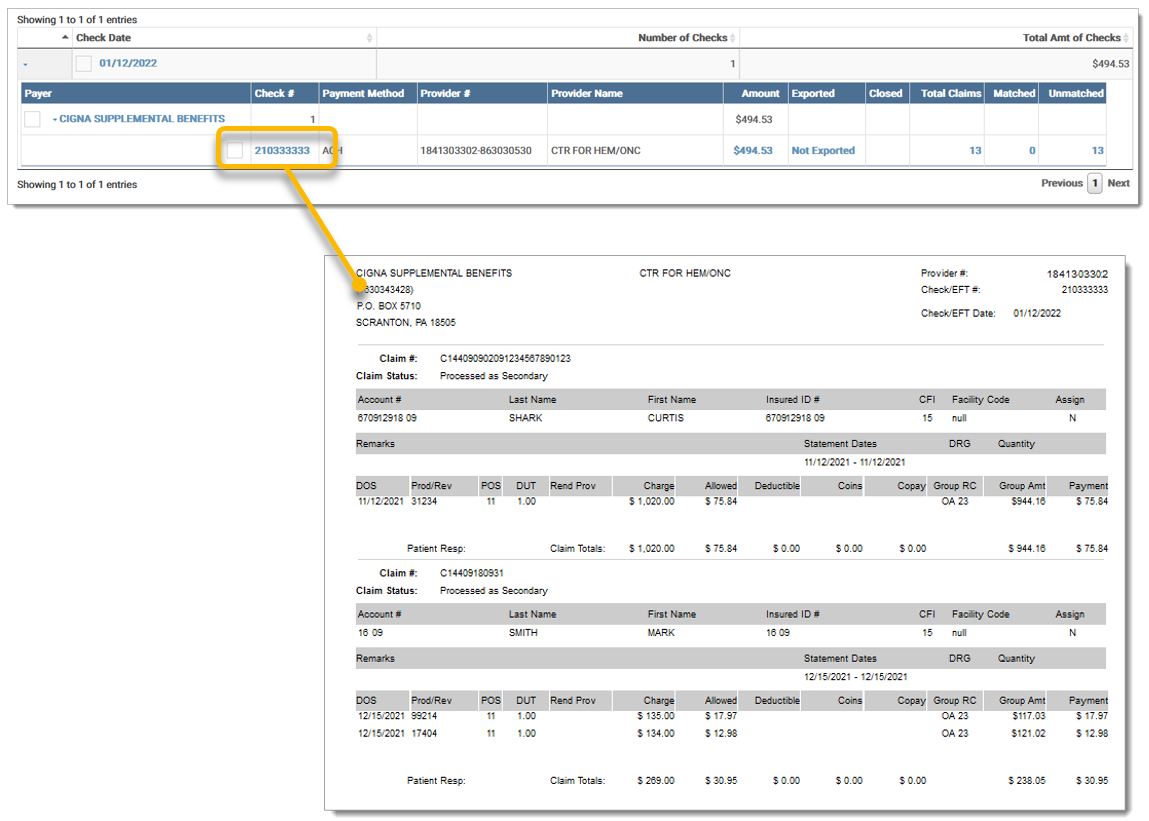
Click the Check link to open the Human Readable Remit Report.
Indicates the Payment Method Code to identify the method for the movement of payment instructions.
Click the Amount link to open the Raw 835 remit report.
To view the Remit Match screen for the Type selected in the search, click the link for Total Claims, Matched, or Unmatched.

The Payment Method Code fields are defined below:
Human Readable Remit example:
Note: Codes only display if the line has values.
The Export History allows users click the Exported date from the Remit Manager drill-down screen to view a list of each time the check was manually exported, as well as all files containing the remit and when exported. Users are then able to reset remit files to queue to be resent.
The date is populated when the remit is exported and if a user exports the 835 manually after a date is populated, the date will update with the most recent export.
To reset a remit file:
Select the exported remit file from Remit Manager.
Click the Exported date.
The Reset screen displays a list of each time the check was manually exported, as well as all files containing the remit and when exported. The Retrieved via API column is populated with Yes or No, depending on if the file was retrieved from eMEDIX or not. Click the File Name to open/download an individual remit. Note: Manually exported remits cannot be reset.
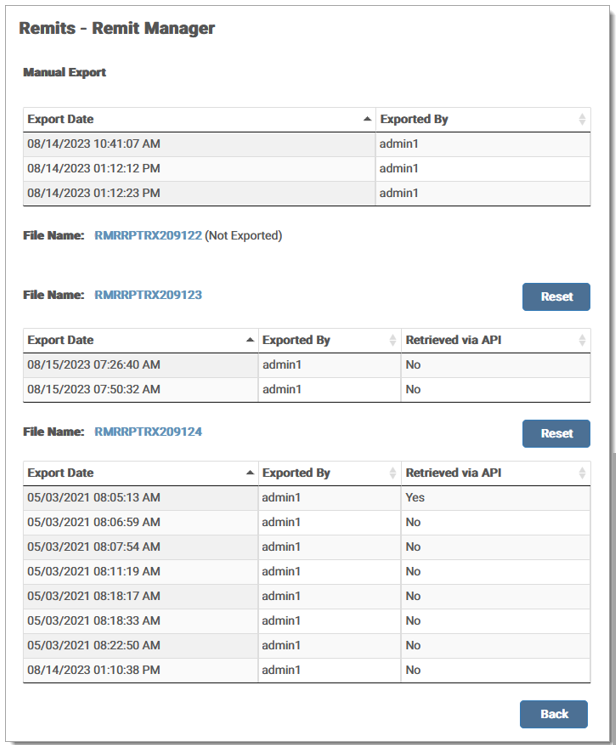
Click Reset. A message displays stating the file reset successfully. Click Back to return to Remit Manager.

If reset successfully, the remit is available in Remits Download to resend.
Files over 90 days are not available to reset. A message displays stating the file is older than the age limit and will not be listed.

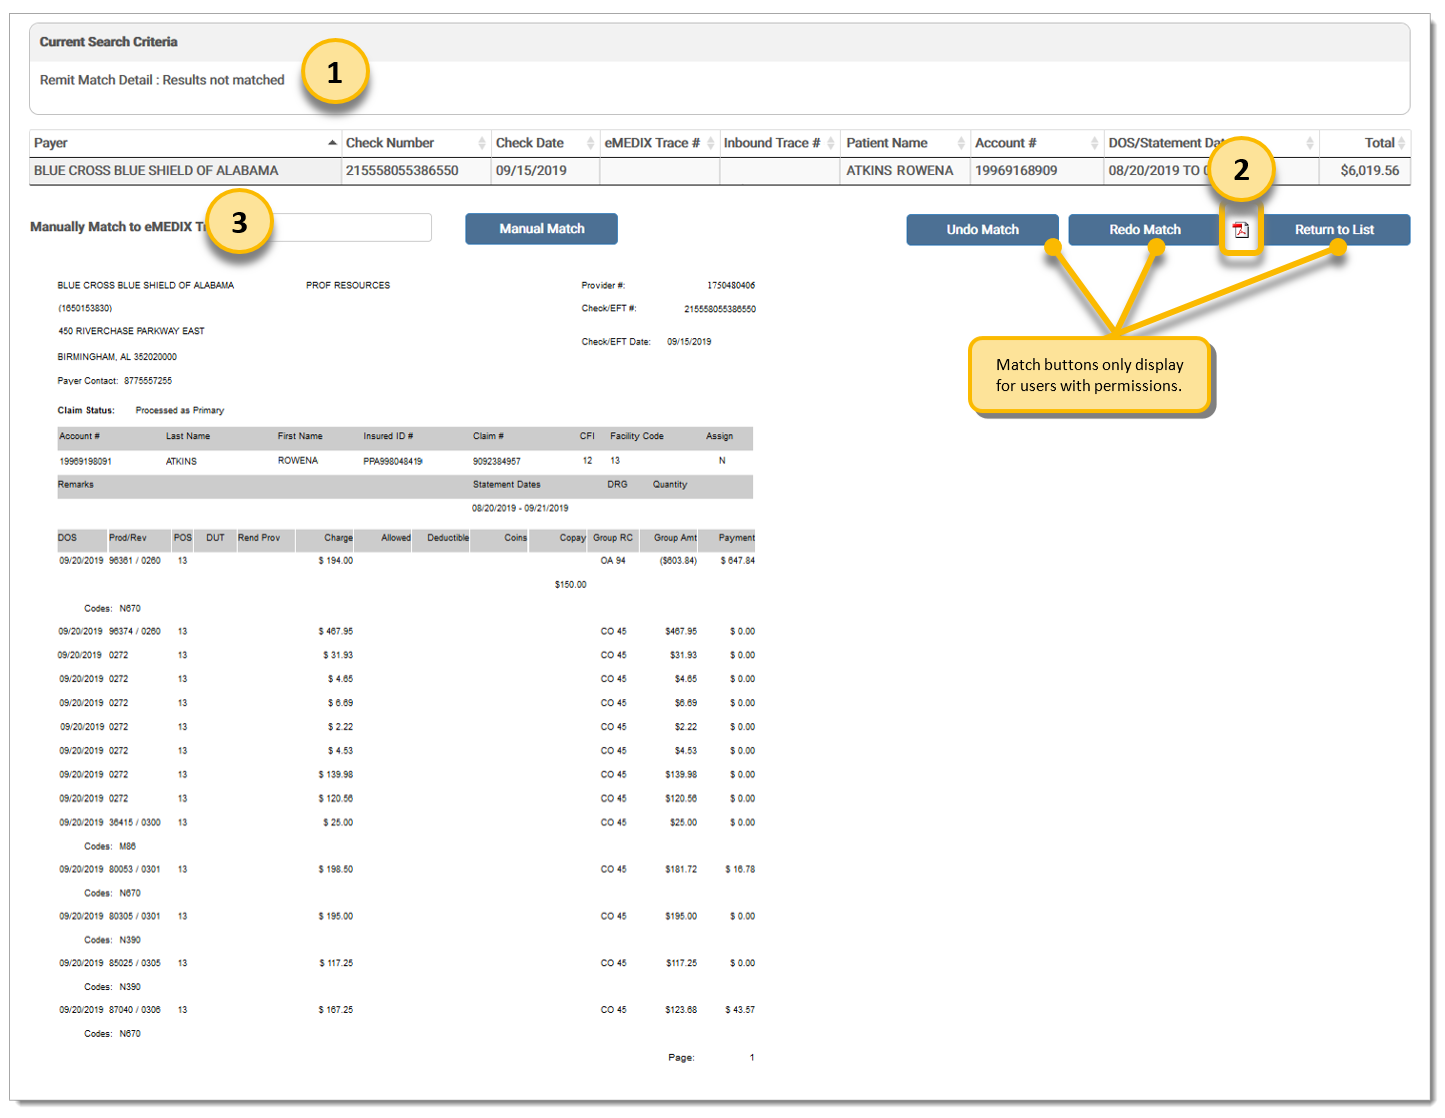
The Remit Match screen allows the user to enter a Claim ID and rematch the claim. This function works by entering a RCM Online Claim ID or a Clearinghouse trace number. The field names on this screen are dependent on the type of customer accessing Remit Manager (RCM customers, Non-RCM Customers, Batch customers, etc.) and the following applies:
Remit Manager uses the Claim ID label for RCM Online customers.
The eMEDIX Clearinghouse Trace # is used for Batch customers.
The Inbound Trace # is used for non-RCM Online customers.
For the Manually Match feature on the Remit Match Detail screen, RCM Online Customers use the Claim ID and non-RCM Online customers use the eMEDIX Trace # to match remits.
Remit Match screen:
Click Patient Name to display the Remit Match Details screen for that particular patient.
Click the Check link to open the Human Readable remit report.
Click the Amount link to open the Advanced Search screen.
Click New Search to open the Advanced Search screen.
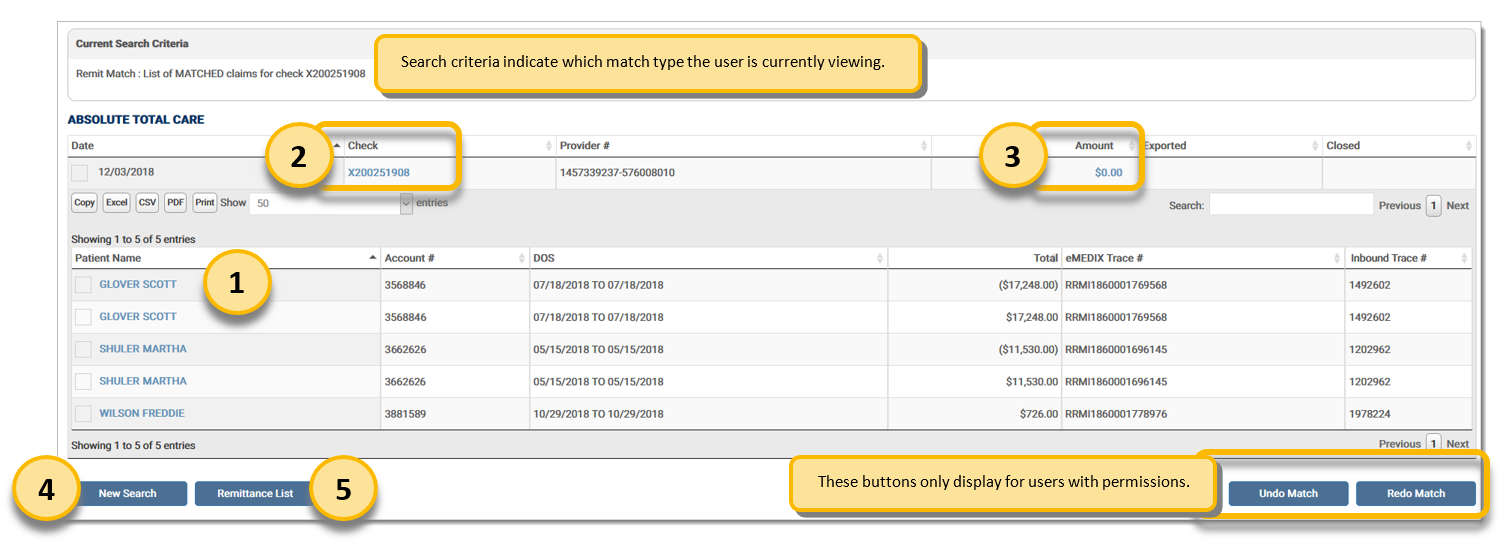
Current Search Criteria indicate whether or not this record has been matched back to a claim.
Click the Adobe PDF icon to open the Human Readable remit report for this individual patient in the user's registered PDF viewer.
Enter an inventory number to manually match the remit. Users must have permissions to view these options. RCM Online Customers use the Claim ID and non-RCM Online customers use the eMEDIX Trace #.
eMEDIX Online | ©copyright 2022 CompuGroup Medical, Inc. All rights reserved.