
The Payment Processor Setup screen allows users with the Payment Vendor Admin permissions to manage payment site configurations for either Global Payments or Easy Pay. The Active tab displays when the user accesses the screen and indicates (Active) after the tab name. Users will only have access to TPIDs that are assigned to the payment vendor(s) in which they can access. The page displays based on the payment vendor required fields/data (For example, if a site is set up for Global Payments, that information displays on the Payment Processor Setup. If they are set up for Easy Pay, then that information displays instead.). If the user does not have access to the Payment Processor, a message displays stating the TPID is not currently set up and to contact eMEDIX Support.
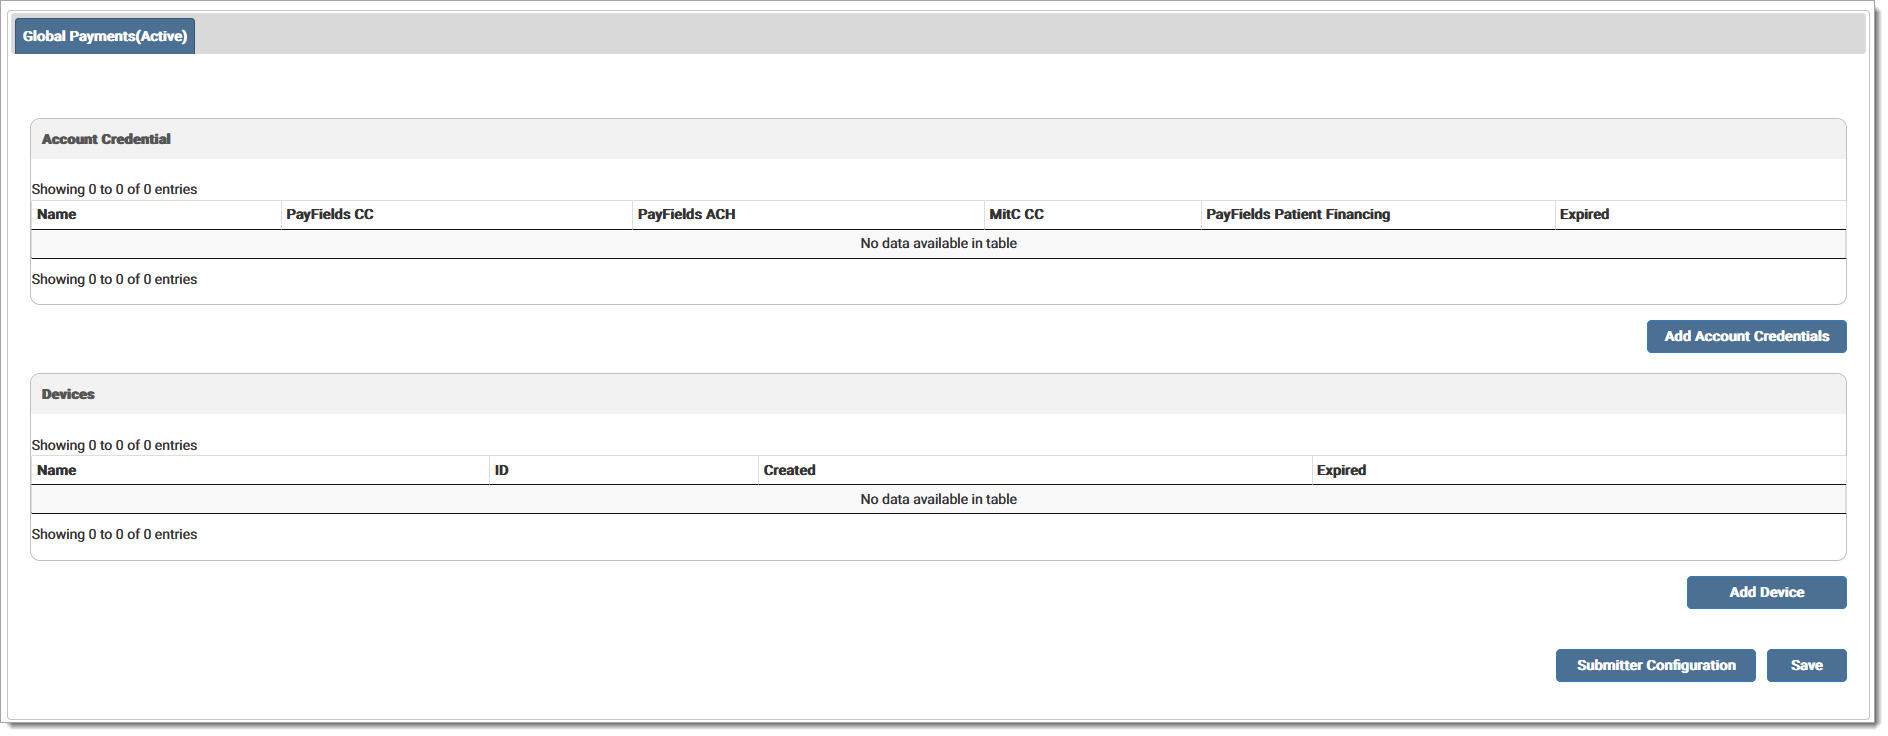
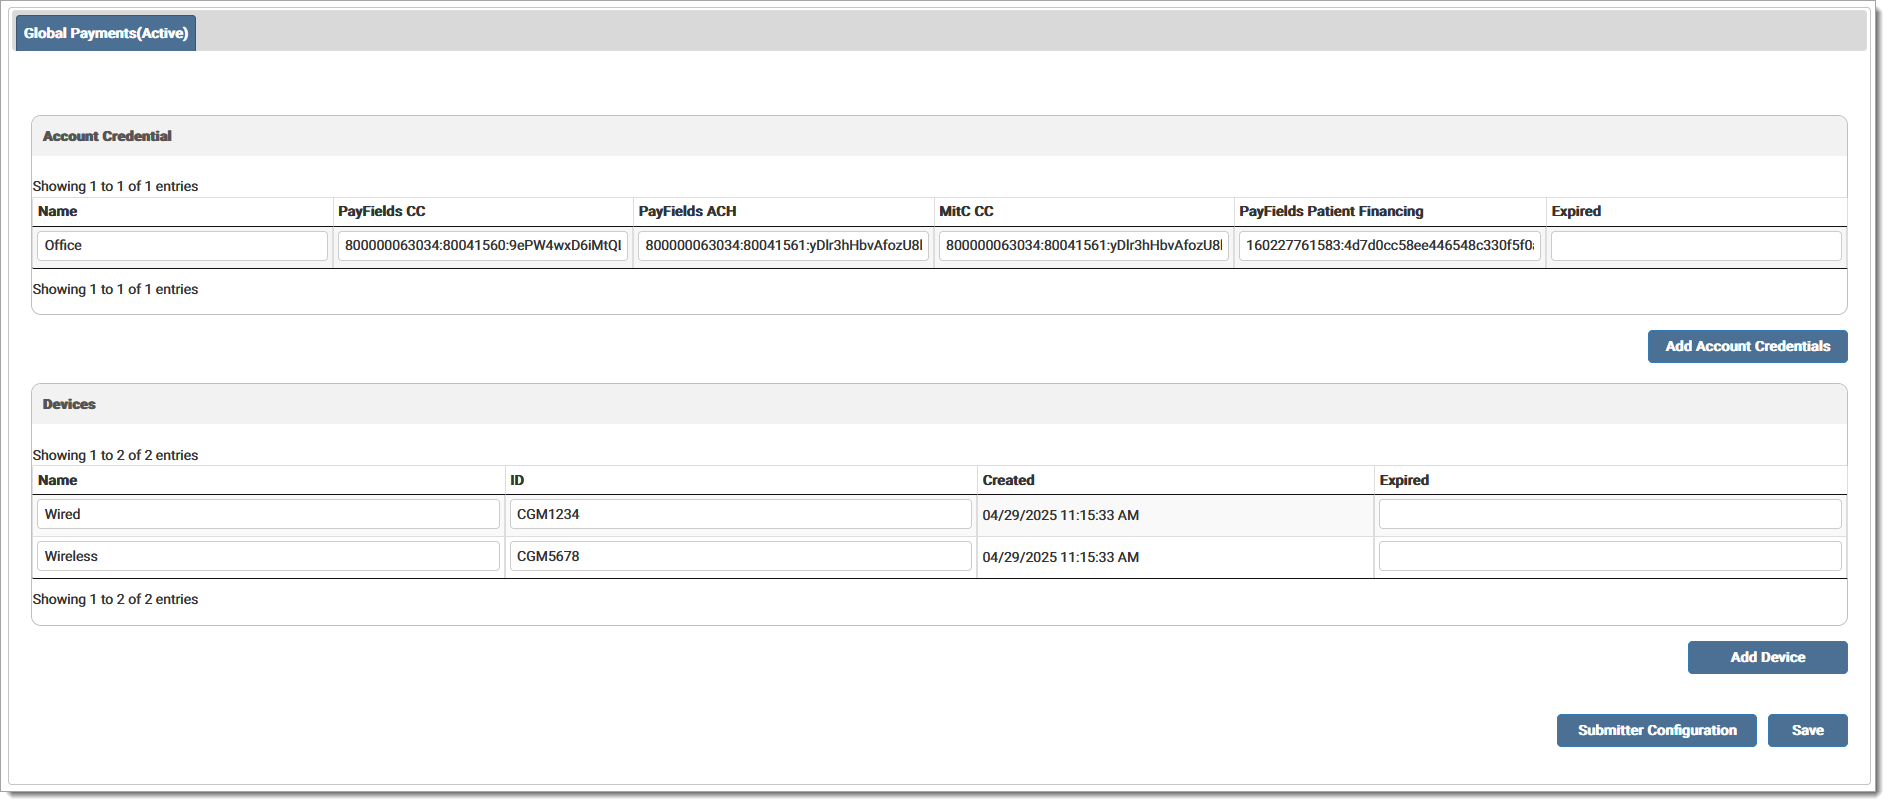
The Global Payments tab includes sections for Account Credentials and Devices. Account Credentials serves as the central hub for setting up and managing payment configurations for each account. Users enter the required details for each payment account using Global Payments. Each account uses a unique name along with credentials for specific payment options such as credit card, checking (ACH) account, and patient financing. Fields that are not applicable can be left blank. This streamlines the process of organizing payment settings.
The Devices section allows users to manage their payment devices or terminals. Within this area, users can assign a name to each device, which could be based on the office location or other identifying features, making it easy to keep track of where each device is used. Then users will enter the specific ID associated with that payment terminal. This setup allows for the addition of multiple devices and ensures an efficient process for identifying all payment devices for an account.
To manage site configurations for Global Payments:
Login with a TPID with Global Payments settings. Select Payment Processor Setup from the Administration drop-down menu. Only sites set up for Global Payments can view this information. Global Payments setups are per submitter.
Click Add Account Credentials to add an editable row to enter the account information. A blank row displays and the user should enter applicable information into each field. To delete the row before saving, click X in the Expired column. A prompt displays asking if you wish to proceed. Click OK to delete the row or Cancel to return to the screen and continue with the account credentials.

Click Add Device to add an editable row to enter the payment device/terminal information. A blank row displays and the user should enter the applicable information related to the payment device(s) into each field. To delete the row before saving, click the X in the Expired column. Click OK to delete the row or Cancel to return to the screen and continue.
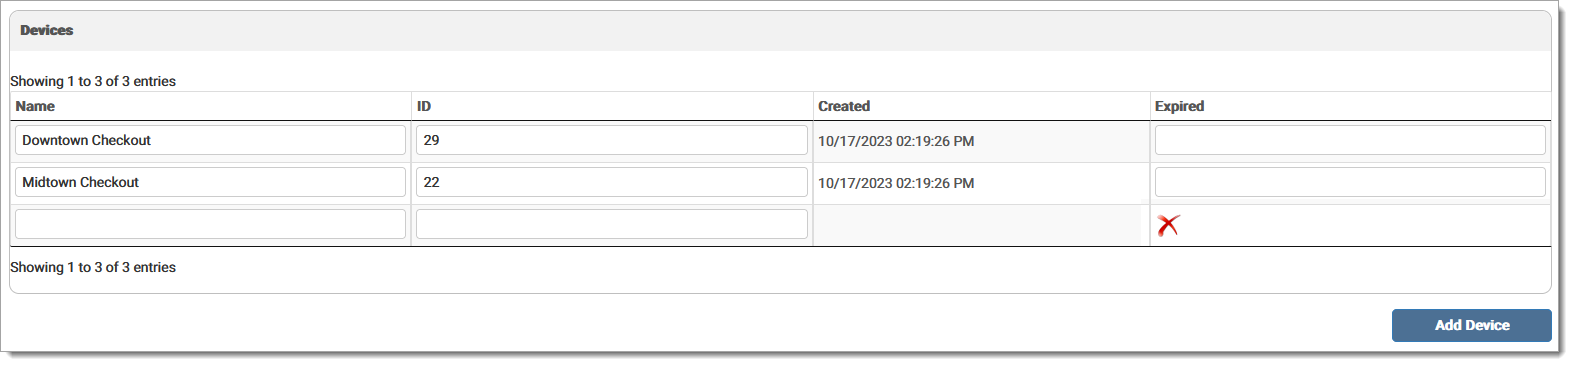
Once the screen is saved, a Create date displays in the Created column.

Users can expire account credentials or a device by entering the desired expiration date in the Expired column and then clicking Save. The expiration date displays in the grid and the credentials and/or devices are no longer applicable. To unexpire a credential/device, delete the date from the Expired field and click Save.

Click Save to save any changes made to the screen before proceeding. If the user attempts to leave the page without saving, any changes made to the screen will be lost.
Click Submitter Configuration to select the appropriate values to associate with the credentials and devices set up on the previous screen. When a site is contracted for eStatements/Receipts, the eStatement/Receipt Campaign Credentials section displays on the Submitter Configuration screen. This section stores the necessary credentials for eStatements/Receipts. The Interface ID and Interface Key are required to retrieve campaign information, allowing users to select a default Payment Receipts Campaign or customize campaigns by submitter. Note: The Interface Key data is treated like a password, with its characters hidden by asterisks. Activity in this section is recorded in the Audit Log; however, the Interface Key details will not be displayed in the log.
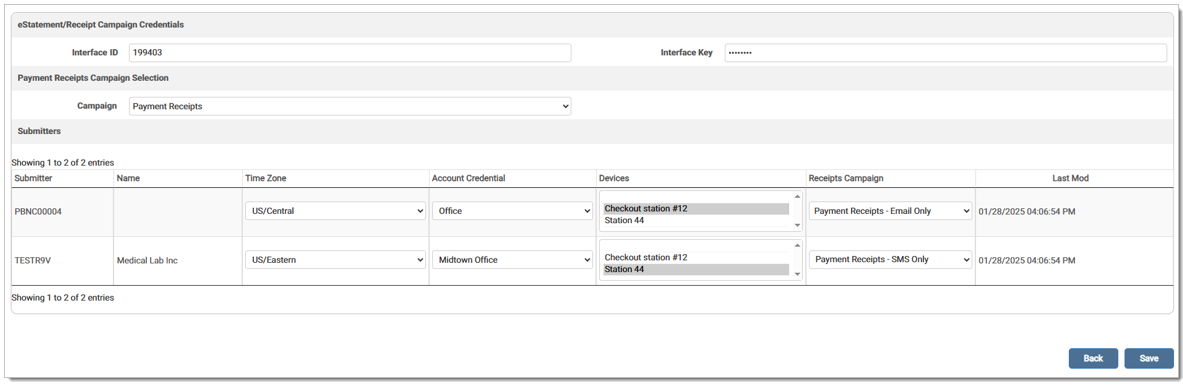
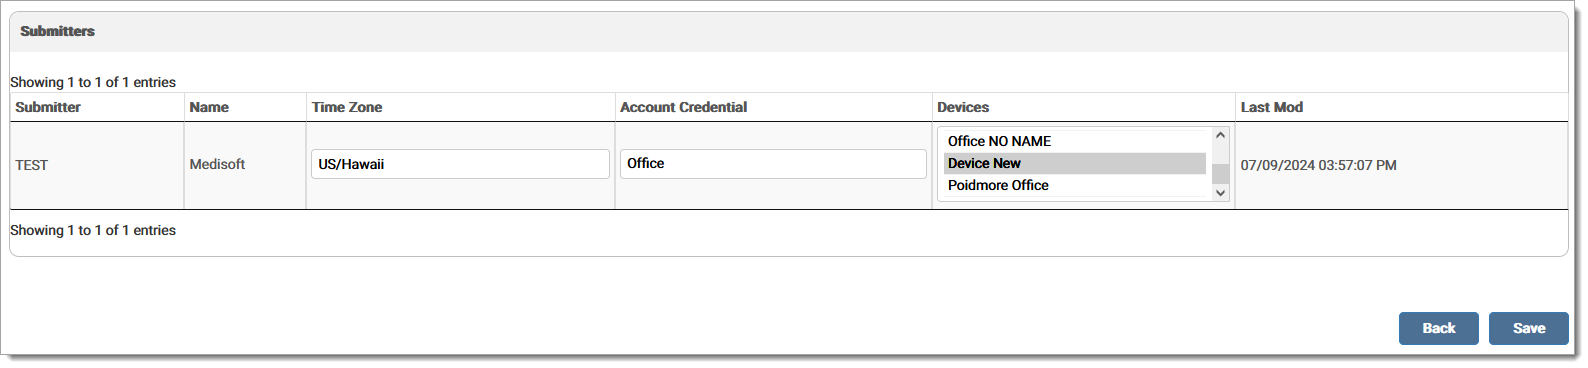
Select Time Zone, the Account Credentials from the drop-down menu, and the device(s) for each submitter. To select multiple devices, click CTRL and each desired device. To customize the Receipts Campaign by a submitter, select the desired campaign from the drop-down menu. Click Save. Once saved, the last modification date displays in the last column to indicate the last time a submitter was modified.
Inactive campaigns will be removed from the drop-down menu. If a user accessed the screen with a selected campaign that is inactive, an error message displays indicating the selected campaign is no longer available, prompting the user to choose a different campaign to continue. Note: If the Campaign Credentials are updated on the Submitter Configuration screen, the credentials will also be updated on the Submitter Setup screen.
A message displays indicating the Global Payment submitters were saved successfully. Setup should now be complete.
A record is added to the Audit Log for the activity.
To manage site configurations for Easy Pay:
Login with a TPID with Easy Pay settings. Select Payment Processor Setup from the Administration drop-down menu. Only sites set up for Easy Pay can view this information. Easy Pay setups are per submitter.
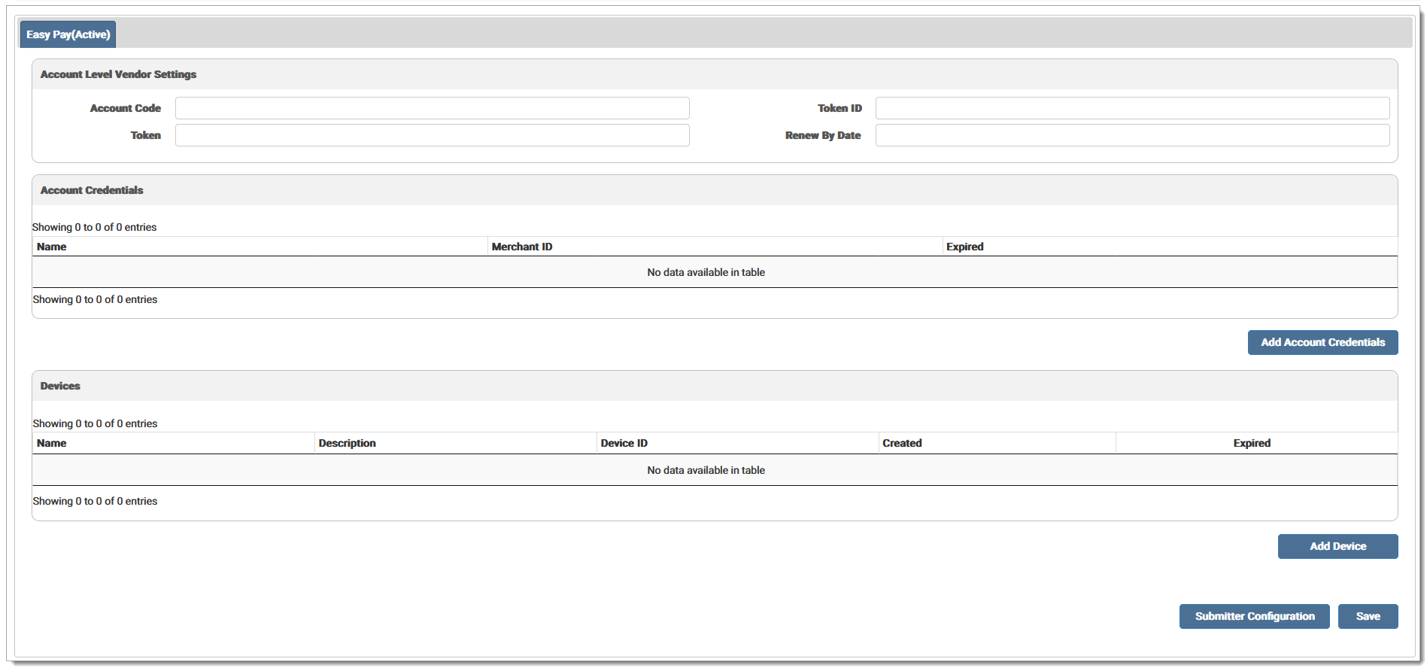
Enter the Account Level Vendor Settings, which includes the Account Code, Token ID, Token, and Renew By Date.

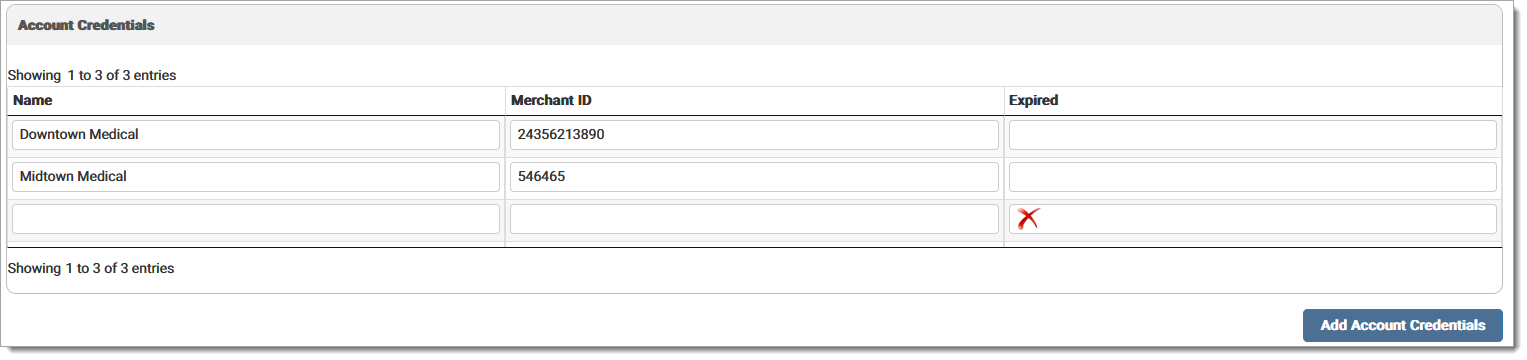
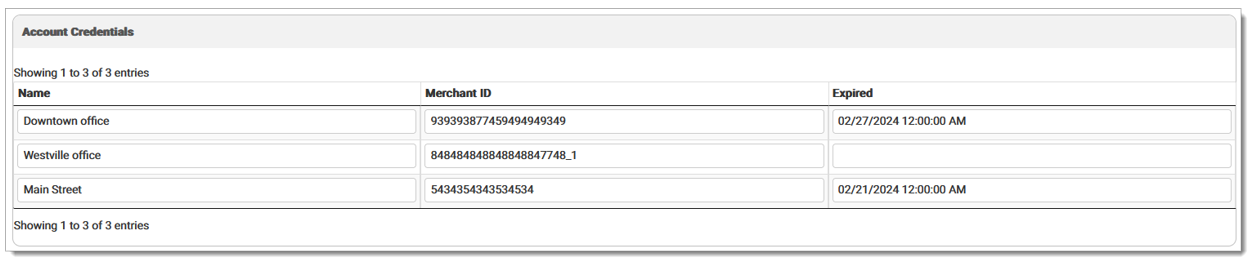
Click Add Account Credentials to add an editable row to enter the account information. A blank row displays and the user should enter applicable information into each field. Account Name and Merchant ID are required fields. To delete the row before saving, click X in the Expired column. A prompt displays asking if you wish to proceed. Click OK to delete the row or Cancel to return to the screen and continue with the account credentials.
Click Add Device to add an editable row to enter the payment device/terminal information. A blank row displays and the user should enter the applicable information related to the payment device(s) into each field. Account Name is a required field. To delete the row before saving, click the X in the Expired column. Click OK to delete the row or Cancel to return to the screen and continue. Once the screen is saved, a Created date displays in the Created column.
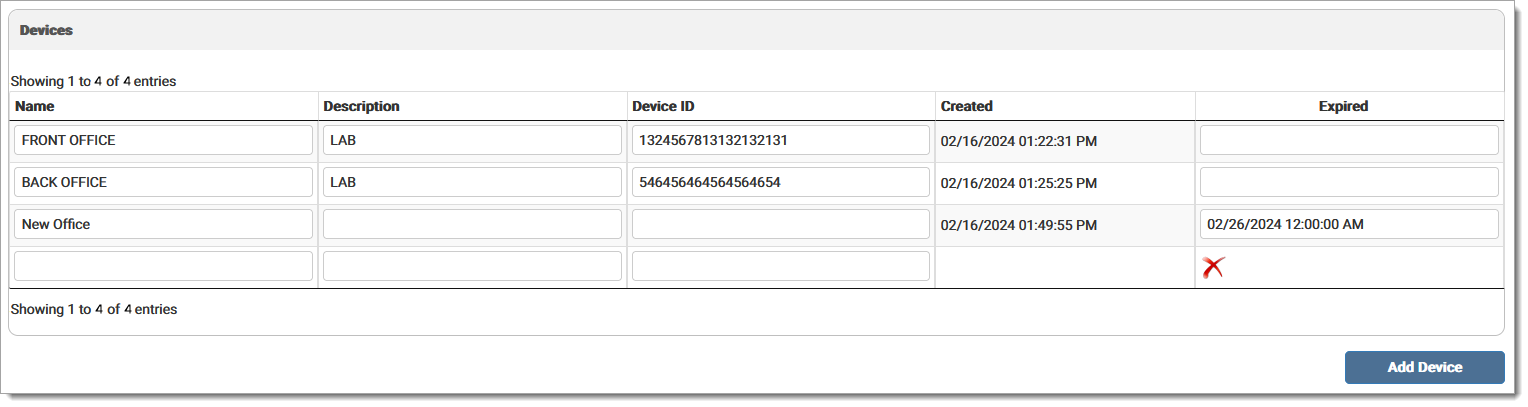
Users can expire account credentials or a device by entering the desired expiration date in the Expired column and then clicking Save. The expiration date displays in the grid and the credentials and/or devices are no longer applicable. To unexpire a credential/device, delete the date from the Expired field and click Save.
Click Save to save any changes made to the screen before proceeding. If the user attempts to leave the page without saving, any changes made to the screen will be lost.
Click Submitter Configuration to select the appropriate values to associate with the credentials and devices created on the previous screen. Select Time Zone, the Account Credential from the drop-down menu, and the device(s) for each submitter. To select multiple devices, click CTRL and each desired device. Click Save. Once saved, the last modification date displays in the last column to indicate the last time a submitter was modified.
A message displays indicating the Easy Pay submitters were saved successfully. Setup should now be complete.
A record is added to the Audit Log for the activity.
eMEDIX Online | Published: 2026.06.11 | ©copyright 2026 CompuGroup Medical, Inc. – All rights reserved.