
To search for claims responses:
Click Claims Console from the Claims drop-down menu.
Responses can be viewed by Payer, Billing NPI, or File. The search option can change based on the chosen View By type. Select the desired option from the View By drop-down menu. Payer Summary view is the default view.
Claims Console Example:
 950
950
View by Payer is the default option, but users may need to select Payer as the View By option if another option was previously selected.
Select the desired payer from the Payer Type drop-down menu. Select All to view an all payer summary by date; or select a specified payer to view a summary for that payer by date.
Enter an Inbound Payer Code, if applicable.
The system defaults to the previous day's submission, but the user may select other dates. Options include Yesterday, Today, Last Full Week, and Date Range. To select a date, choose Date Range from the Process Date drop-down menu and enter the desired dates in the From and To fields. The date format is MM/DD/YYYY.
Click Summary Search. The Submission Summary displays for the selected payer(s). If Summary Search fields are not entered correctly, an error message displays.
Click on the desired label to view the detailed report or enter search criteria to filter for specific claims.
NOTE: If the claim is missing a payer code, it is listed as Unknown in the Summary table.
Select Billing NPI as the View By option.
Enter a Billing NPI, if applicable.
The system defaults to the previous day’s submission, but the user may select other dates. Options include Yesterday, Today, Last Full Week, and Date Range. To select a date, choose Date Range from the Process Date drop-down menu and enter the desired dates in the From and To fields. The date format is MM/DD/YYYY.
Click Summary Search. The Submission Summary displays for the selected payer. If Summary Search fields are not filled out correctly, an error message displays.
Click on the desired label to view the detailed report or enter desired search criteria to filter for specific claims.

Select File from the View By drop-down menu. Enter a File Name, if applicable. Note: The File Name is case specific and must match exactly to the name in the inbound table, otherwise the search will not pull the data correctly.
The system defaults to the previous day’s submission, but the user may select other dates. Options include Yesterday, Today, Last Full Week, and Date Range. To select a date, choose Date Range from the Process Date drop-down menu and enter the desired dates in the From and To fields. The date format is MM/DD/YYYY.
Click Summary Search. The Submission Summary displays for the selected payer. If Summary Search fields are not filled out correctly, an error message displays.
Click on the desired label to view the detailed report or enter desired search criteria to filter for specific claims.

The Claim Filing Indicator (CFI) types in the Payer Type Summary table are defined below:
|
CFI |
Description |
|
12 |
Preferred Provider (PPO) |
|
16 |
(HMO) Medicare Risk |
|
BL |
Blue Cross/Blue Shield |
|
CH |
CHAMPUS |
|
CI |
Commercial Insurance Co. |
|
HM |
Health Maintenance Organization |
|
MA |
Medicare Part A |
|
MB |
Medicare Part B |
|
MC |
Medicaid |
|
WC |
Workers' Compensation |
The following Claim Filing Indicators are listed as All Others:
|
CFI |
Description |
|
11 |
Other Non-Federal Programs |
|
13 |
Point of Service (POS) |
|
14 |
Exclusive Provider Organization (EPO) |
|
15 |
Indemnity Insurance |
|
17 |
Dental Maintenance Organization |
|
AM |
Automobile Medical |
|
DS |
Disability |
|
FI |
Federal Employees Program |
|
LM |
Liability Medical |
|
OF |
Other Federal Program |
|
TV |
Title V |
|
VA |
Veterans Affairs Plan |
|
ZZ |
Mutually Defined |
The File Summary fields are defined below:
|
Field |
Definition |
| Accepted | Claims where a Final accepted response has been received and the payer is accepting it for adjudication. NOTE: Historical claims with accept messages will be listed under Accepted. |
| Acknowledged | Claims where Initial responses from the payer have been received. This is an acknowledgement of a receipt, but not necessarily of an acceptance. |
|
Denied |
Claims that have been processed and found to be unpayable. |
| Forwarded | Misdirected claims are forwarded to the appropriate financially responsible entity. |
| Paid | Claims that have been processed for payment. |
|
Rejected, Not Worked |
Rejected claims that have not been crossed off in the response detail screen. |
| Total Received | All claims submitted for the dates chosen, including those marked worked. |
| Transmitted | Claims that have been sent to the payer, but no initial resonses have returned. |
The available options within the screen vary based on user permissions. Rejected claims display in red. This screen may be accessed from the Payer Type Summary, the File Summary, and/or the Payer Summary on the Claims Console. The current search criteria displays at the top of the screen. Click the Trace ID to open a pop-up window displaying the inbound claim data. Mark the Worked check box to remove claim(s) from the list. Responses marked as Worked are struck through.
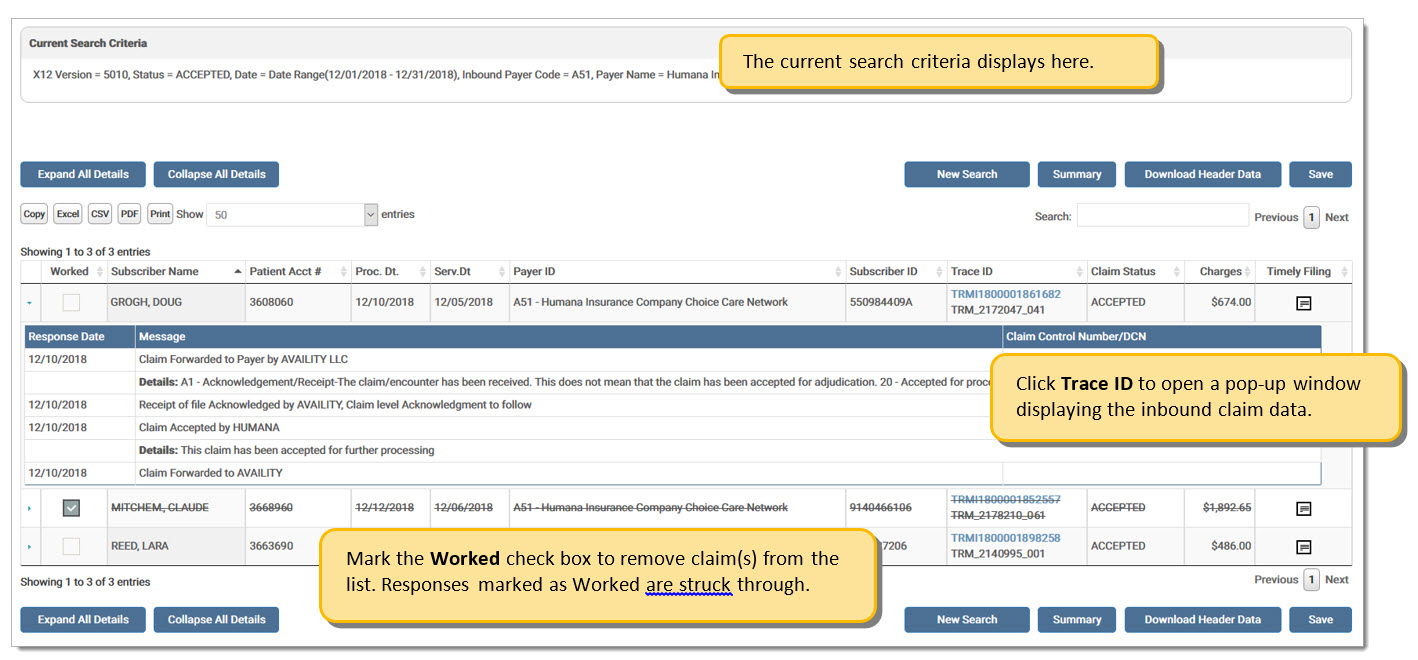
Note:
When a user marks the Worked check box for a claim, the claim information is struck through immediately. To save the status as Worked, the user must click Save before exiting the screen.
Note:
There is a record limit of 1,000 results on Responses. If a user's search selection returns more than the limit, the first 1,000 display with a message suggesting the user narrow their search criteria to see additional results.
The report options are defined below:
|
Option |
Definition |
|
Expand All Details |
Expands all responses beneath each claim. |
|
Collapse All Details |
Hides all responses beneath each claim. |
|
New Search |
Opens the Advanced Search screen. |
|
Summary |
Returns to the Summary screen. |
|
Download Header Data |
Downloads the claim header data in .csv format. Allows the user to view the response message that set the claim status. Options include Subscriber Name, Patient Account Number, Proc Date, Serv Date, Payer ID, Subscriber ID, Trace ID, Outbound Trace ID, Charges, Claim Status, Response Date, Status Message, and Detail Message. If the Claim Status is Transmitted, the claim will not have a response. |
|
Save |
Click to save the Worked status before exiting the screen. |
eMEDIX Online | ©copyright 2022 CompuGroup Medical, Inc. All rights reserved.